|
|
 Home > Products > iShareCam Home > Products > iShareCam
|
| |

|
Model No.
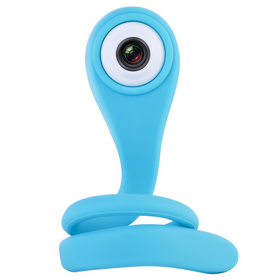
iShareCam
Specification
| Image Sensor |
SONY 8MP CMOS Sensor |
| Still Image Resolution |
20/16/12/8/4 MP (*12-20MPinterpolated) |
| Video Resolution |
- 1080P: 1920x1080 @30fps
- 720P: 1280x720 @60fps
- 720P: 1280x720 @30fps
|
| Wide Angle Lens |
120 Degrees |
| File Format |
JPEG, MOV |
| microSD card |
Supports up to 32GB (required for use, not supplied) |
| Interface |
High-speed USB 2.0 |
| Battery |
120 times (fully charged) |
| Speaker/Microphone |
Built-in |
| Wireless |
120 times (fully charged) |
| Remote Controller |
2.4G |
| Dimensions (LxWxH) |
Approx. 1.7”x1.7”x1.3” |
| System Support |
- Windows® XP, Windows® Vista™
- Windows® 7, Windows® 8
- Windows®10 and above
- Works with Mac 10.8 and above
|
| ISHARECAM APP |
- Supports IOS 7.0 and above
- Android OS 4.1 and above
|
|
|
Introduction
Record those precious moments in your everyday life easily at anytime, anywhere with iShareCAM.
|
|
What is iShareCAM?
It’s an extension of yourself that integrates with all aspects of your daily life. Not simply a camera, but the “must have item” of 2016.
|
|
iShareCAM design inspiration from your daily life
It started with the challenge from the idea that everyone should be able to use a camera easily and be lightweight. That could transform its shape freely and fixed without a cradle. Also at various angles that were unavailable until now. iShareCAM takes you one step closer to a comfortable everyday life.
|
|
iShareCAM infinite potential
Existing action cameras are good, but too heavy and expensive. We have to put up with the discomfort caused by narrow views from cell phone cameras. iShareCAM is beyond these limitations. From action cameras to cell phone cameras, and now, iShareCAM.
|
|
iShareCAM as part of everyday life
With its ability to flexibly transform, you can now pretty much put iShareCAM anywhere. (head, arm, leg, bike, bag, belt, anywhere) iShareCAM will be a part of your everyday life.
|
|
iShareCAM features
■ Affordable strength & flexibility
iShareCAM is flexible enough to transform into any shape and sturdily constructed of polyimid resin. You can handle iShareCAM freely and as much as you want in any situation.
■ No ugly accessories
You can be liberated from cumbersome equipment. Its flexible body can be used to fasten iShareCAM everywhere securely.
|
|
Package Included
1.iShareCAM Main Unit.
2.2.4G Remote Controller.
3.CF Card 32G.
4.Magic Sticker.
5.Micro USB to USB Cable.
6.Car Charger 3.1A 5V.
7.Bike Bracket.
8.Headband.
9.User Guide.
 |
|
|
How iShareCAM works
■ Simply & easy operating
iShareCAM’s one touch button allows you to utilize main functions literally as easy as one, two, three and audio notifications will let you know what function you're currently using. And you can shoot via 2.4G from long distance.
■ Shoot a video using the iShareCAM APP
Partial integration with free iShareCAM app (iOS and Android) over 2.4G. You can preview your shot before you start filming.
■ Great Versatility with iShareCAM
Whether snorkeling, snowboarding, or tearing up the bike track, iShareCAM is ready for any adventure. It's compatible with every Contour Camera mount giving you unlimited angles. 120 degree wide angle means no matter where the PIC is mounted, you'll always get the perfect leveled shot.
■ USB dierect OTG output for easy file transfer
iShareCAM has a built-in memory with 32GB (max). And with USB direct OTG (On-The-Go) output, you'll be able to share your iShareCAM’s photos & videos with friends and family on your Mobile Device & PC (USB direct OTG included).
|
|
Operation steps
■ Product Overview

| 1.Shutter Button. |
6.Tripod Mount. |
| 2.Power Button. |
7.Cover/Capping. |
| 3.Lens. |
8.USB Port. |
| 4.Charging/Working Indicator Light. |
9.Reset. |
| 5.Wi-Fi Button. |
10.microSD Card Slot. |
■ Preparing for Use
■ Charging the Battery
Connect the camera to a computer through the provided USB cable.
Red charging indicator will light up.
Once camera is fully charged, the indicator light will turn off.
NOTE: Camera will automatically power on when it’s charging. You may manually power it off by pressing power button for 3 seconds.
■ nstalling the Memory Card
A micro SD memory card is required for operation;micro SD card is not supplied. Twist open the cover from the bottom of the camera with a coin and then insert a memory card in the micro SD slot.

■ Mounting the Camera
Reversible suction pad and magnetic mount allows you to attach the camera onto many different materials and surfaces. Such as wood, glass, wall, plastic and metal surfaces. Remove camera from surfaces by lifting the camera from bottom up.

■ Cleaning Instructions
To clean and reuse, rinse the suction pad part with water when it is not sticky enough. Air-dry completely before mounting.
WARNING: DO NOT WET CAMERA BODY. DO NOT IMMERSE IN WATER.
■ Using the Camera
Power On: Press and hold the power button. The power light will flash and then remains stable light.
Power Off: Press and hold the power button.
NOTE:
1.When the camera is idle for 3 minutes, it will turn off automatically.
2.During operation if the camera turns off automatically after the working indicator light continuously flashes for 1 minute, it indicates the power of battery is insufficient. Please charge the camera when battery is low.
■ Taking Pictures
1.Turn on the camera.
2.Press the shutter button once to take a picture; the working indicator light will flash once and you will hear a sound once image is captured.
■ Recording Videos
There are two different Video recording modes:
1.Camcorder mode
2.Vehicle Mode (Dash cam)
| Camcorder Mode |
Vehicle mode |
1.Turn on Camera.
2.Press and hold shutter button for 3 seconds and then release to hear a beep sound and see the working indicator light start flashing to start/enable video recording.
3.Press the shutter button once to stop recording.
4.Loop recording: OFF; disabled in camcorder mode. |
1.Connect camera to a cigarette lighter USB port (not supplied). The camera will turn on automatically.
2.The camera will record 3-minute interval files continuously.
3.The camera will turn off automatically once vehicle is turned off.
4.Loop recording: ON; enabled in vehicle mode. |
■ Connections
■ Remote Control Connection
Remote control is connected automatically once camera is powered on.
NOTE: The remote is disabled if camera’s Wi-Fi feature is enabled. Turn off Wi-Fi mode on camera to use remote control.

■ Capture/Recording button
Still Image Capture: Press and hold the button for 3 seconds until you hear and see the working indicator light start flashing to enable video recording. To stop recording, press and hold the button for 3 seconds again. Working indicator light will stop flashing and will turn off.
| Camera mode |
Press Video Protected button to… |
| In standby mode. |
Start a 3-minute video recording under protection. |
| In recording mode. |
Start recording a new 3-minute video. |
| In vehicle mode. |
Lock and protect current video recording. |
■ Video Protected Button
Protect your files in case of an emergency or save your files from being looped-over. Protected files will be saved in a separate “EVENT” folder inside the memory card for easy access.
Loop recording:Lock and protect the video files from being deleted or looped-over if your memory card is full. Camera’s loop recording feature automatically replaced the oldest files by over-writing the file Press the Video Protected Button to prevent file over-writing.
■ Computer Connection
There are two ways to download files from the memory card to a computer.
1.Insert the memory card into a card reader.
2.Connect the camera to a computer through the provided USB cable.
| Using a Card Reader |
Camera to PC with USB cable |
1.Take out memory card from camera, then insert into a card reader connected to your computer.
2.Open [My Computer] or [Windows Explorer]. Access the “Remove Disk” representing the memory card.
3.Copy the files to your computer. |
1.Connect camera to a computer through the provided USB cable, then turn on the camera.
2.Open [My Computer] or [Windows Explorer]. Access “Removable Disk” representing the memory card.
3.Copy the files to your computer. |
■ Smartphone Connection
Connect camera to your smartphone or smart devices to view, control, save, and share your photos and videos.
1. Download Free “Ishare Cam” APP
Search “Ishare Cam” APP from Apple App Store or Google Play. Download and install APP to your smart device.
2. Open camera’s Wi-Fi
Press Wi-Fi button on the camera.The Wi-Fi light will start to flash.
NOTE: When button beeps and flashes, this means there is insufficient power to for wireless connection. Please charge camera.
3.Connect smart device to camera
Open Wi-Fi on your smartphone and search “SDV-8570” from the list of found devices.Input password “1234567890” to connect.
4. Connection Successful
Camera’s Wi-Fi light will stop flashing and remains stable when connection is successfully paired. Open “Ishare Cam” APP to operate and control the camera from your smart device.
5. Exit Wi-Fi mode
Press the Wi-Fi button once to close Wi-Fi function. The light will flash several times before turning off.
NOTE:Remote Controller can not operate when Wi-Fi mode is turned on.
■ APP Features

“Ishare Cam” APP allows you to capture, view, save and control the camera using your smartphone or smart devices. With APP, you can adjust and set the settings for your camera.
•Set video/photo resolution.
•Start/stop video recordings.
•View photos and videos.
•Set Self-Timer.
•Shoot Time-lapses.
•Capture continuous shots.
•Record slow motion.
|
•Capture photos.
•Adjust white balance.
•Rotate camera view.
•Adjust video frequency .
•Format camera.
•Share/Post to social media.
•View battery indicator.
|
| | |